
My Custom Air Tank
- Jul 4, 2024
- 6 min read
When building the WRX, my whole goal is to create the parts and pieces of the car to be so unique that if they were removed, people would still recognize them as belonging to my Subaru. And when it came to my air tank, it just didn't fit the vibe. So it was time to change that.
Not only was the air tank not up to par, the trunk space as a whole was lacking an element to create a cohesive look with the recent upgrades in the cabin. Particularly I wanted to bring in the white honeycomb stitched vinyl I had on my limited edition Corbeau seats, floor mats and door panels. With the extra white vinyl I had lying around I decided to make a DIY tank cover.
Jump to:
Tank Cover
Although I had left over white vinyl, which I purchased from Corbeau they were unable to supply the vinyl with the pattern already stitched. I had previously had my door panels custom stitched from Wasatch Upholster but it ended up being much pricier than expected. I thought if this was hand stitched, then I too can hand stitch. So with no previous experience of sewing beyond junior high home economics, I decided to DIY.

I started off by measuring with caliper the original honeycomb pattern on the Corbeau seats and used that to design a file on the laser software I have access to use at my work. This way I had a stencil that I could use to hand draw the pattern onto a piece of the white vinyl.

Creating an exact stencil was key to insure that the hand stitched honeycomb, I would be attempting for the first time, would be consistent and accurate to the original design. I considered every detail while recreating the design, even down to the thread size and stitch lengths.

The stitching went surprisingly well. I borrowed my moms sewing machine and made my first attempt on a scrape vinyl. I was worried about the machines ability to sew through multiple layers of vinyl, but with ease I made my first straight line. After changing some settings and practicing a few patterns on the tiny scrape, I felt ready. Thee stitch, wasn't incredibly challenging, mostly tedious. And stressful. But as I came to the end of the vinyl, I was sad that I would soon be putting the sewing machine away.

Once I had stitched a whole sheet of vinyl, it was time to cut to length and make notches for the brackets. Again using our CO2 laser, I measured the tank and built a file on the computer for the laser to cut. I use the laser for it's precision, but as bonus it's also super satisfying. If you don't have access to a laser cutter, don't let that hold you back from building something cool, this project is doable by hand!

Now time for some finishing touches! This stitch was super satisfying and definitely more of a challenge. It even required a new special pressure foot for our sewing machine which I purchased and learn to use at my local Joanns craft store. But it turned out amazing!

Here is the tank cover all done! I think it turned out amazing, but it still needed more. It looked a little unfinished. Particularly, the mismatched whites of the painted tank and the new vinyl. So I decided the white paint needed to go!
Polishing the Tank
Having worked with the polished lips on my SevenK Wheels, I knew I could make this aluminum air tank shine like chrome. Again the goal with my projects is to make parts look like they belong on my Subaru, before they're even installed onto the car. So matching the air tank to the polished wheels felt right! I knew this was going to be VERY time consuming, so I was trying to think of ways to polish this tank in an efficient way. In my head, the only good way to do this was to spin the air tank on a lathe! Luckily, I have a good friend who was willing to help me sand and polish the air tank using his lathe!
But first, I had to strip off the old paint. I decided that the white painted tank that had aged in the sun from many outdoor car shows, was taking away from the beauty of the new bright white vinyl cover. Although I could repaint it, I preferred to add a little contrast, nothing to blend in with the dark grey suede of the trunk lid linier but enough to add dimension.

Stripping the paint was a lot more work than I expected. I used some aircraft paint stripper, which is a strong chemical that eats away at the old paint after sitting for a few minutes. As you can see, the paint eventually falls off leaving the raw "spun" aluminum finish.

Finally, it was time to mount the air tank in the lathe and sand the surface smooth from it's original deep textured finish. I started with 80 grit sand paper and worked my way up to 5000 grit wet sand paper. From there, I took a small 2 inch polisher and some metal compound to the air tank, while spinning it on the lathe and got some really exciting results!

Building the Hard Lines
Of course I couldn't stop there. I was excited about the results I was getting, but still wanted MORE! I felt as if it needed more hard lines to utilize the remaining two ports left on the air tank. I started by mocking up what I had pictured in my head. The goal was to look intricate but not overwhelming. For me, that meant intertwining.

I found this tie down strap in the garage that is used to secure things to walls for storage. It caught my attention because I could bend it to any shape, as many times as I wanted. I decided to use this to get a visual of what it would look like on the tank. I spent a lot of time just mapping it out, and the picture above was my end result.
But then again... I still wanted an additional form of testing before I risked using my only aluminum hard lines that were fairly expensive. So long story short, I went up the street to the hardware store with my dad, and purchased a roll of 3/8" copper tubing. I took it home, bent that to the shape I created, and this is what I came up with (see photo below).
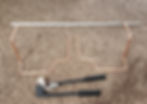
The copper bent smooth and looked way better than I expected. I used the copper lines to test fit before I officially shaped the aluminum.

The contrast between the two metals struck me. On complete accident, I was 100% convinced that I am keeping the copper! Next, I hand sanded and polished the copper lines to make them super shiny. Then I coated them in wax to help prevent tarnishing. Once I finished what I was expecting to be my final assembly. I encountered a big issue. None of the hard lines wanted to stay upright. The weight of them was making them droop and twist and it made them look really inconsistent.

I drove up to work to design and cut this little bracket to support the air lines to the tank! This piece pictured above has a hex head cutout on the top to slide onto the drain plug on the bottom of the air tank, and twist to lock it into place. I made it out of gloss black acrylic, and cut it out on the laser. I engraved an outline of "CSIZZLE" on the face of the material to essentially cut the protective layer of paper out so that I could use it as as template or masking. I painted the whole piece satin black, and then removed the paper I had cut out earlier to reveal the two finishes.

Here I made another clear acrylic bracket to help keep the spacing between the two air lines consistent. I made this one out of clear acrylic because I didn't want it to be distracting.
The Final Product


I wanted to bring in elements from the rest of my interior and give the trunk a fresh new look, the tank was a really great start but I still have much more to do. Make sure you follow along to see all the progress I make while updating my trunk set up!